Follow the Leeder in Personal Training and Boot Camp!

Follow the Leeder in Personal Training and Boot Camp!

Tuesday, May 28, 2013

May 28th...The Waffle-izer, 4 ingredient Paleo friendly waffles!

OK so in the vast amounts of spare I have I like to watch the food channel, shows like " Ya Gotta Eat Here" and "Diners, Drive-ins and Dives" because they are funny and I get inspired by SOME of the meals that these creative people come up with!  I also watch it because some of these meals are insanely high in fat and sugar, it's crazy!  So lately the show has featured a couple of restaurants that make waffles and serve anything and everything on them and in them.  So I thought why can't I do that?  I'm going to "waffle-ize" whatever I can, so look out kitchen here I come!
So I started with a basic 4 ingredient recipe for these waffles, Coconut flour, Protein powder, egg whites and Greek yogurt.  I added vanilla, dark chocolate and a pinch of cinnamon...this is pretty much your base minus the last 2 ingredients...
 I pounded out the dark chocolate, that way you get more pieces in every bite!
 Wet and dry ingredients separate....
OK note to self, Coconut flour thickens up seconds!  I thought I could whisk this all together, nope!  Use a spatula to mix ingredients together and save yourself this mess!
Fire up the old Waffle maker...I sprayed the hot plates lightly with Pam cooking spray, then divided the recipe into 4 and dropped the mix on the hot plates and closed it up...now wait 2-3 minutes for the magic to happen!
BOOM! they were done just like that!  Those are not burn marks by the way...that's melted chocolate...
What I love about these waffles is that they are super fast to prepare and cook.  They are rich in flavor...the Coconut flour is already a bit sweet so don't over do it with more sweet items.  I ate my waffle this more with shredded apple on it, so good!  What I didn't like and need to tweak in this recipe is, that the waffle is a bit dry and heavy tasting.  I think next batch I will add a couple of tbsp of Almond milk.  I'll keep you posted, let me know what creations you come up with!

Ingredients
1/3 cup plain 0% Greek yogurt
1/3 cup egg whites
1/2 cup Coconut flour
1 scoop Protein powder
extras...1 tsp vanilla, 2 piecec dark chocolate


Saturday, May 25, 2013

May 25th...Apple Pie Energy Balls!

Energy balls are one of my favorite go-to snacks.  They are the perfect snack to have before or after a workout, to pack on a hike, to take to work for the 3 pm tummy growl and your kids will love them too!  You can pretty much add anything you want to them, so I decided to make "Apple Pie" flavor...
OK super helpful tip from one of my Boot Campers Janine, she told me to soak the dates in warm water while I set everything up, so about 5-10 mins.  This helps to break apart the dates and soften them up.  By softening up the dates, they mix up easier in the food processor.  Last time I made power balls, I didn't soak the dates...I almost burnt out the motor, because my food processor was vibrating all over the counter, it was working so hard to chop up those dates!   
See this giant container of nuts and seeds, my Mom gave it to me and I figured I'd better use it up.  Here's one of my helpful tips...put all your nuts and seeds in the food processor FIRST, and chop them up to the consistency you want...don't go too crazy as you might end up with nut butter! I also added the cinnamon in with the nut and seed mixture just to make sure it blended in evenly...
Drain the dates really well, I actually squeezed the extra water out with my hands...I chopped up the dried apples first because I thought they might not get as finely chopped up once I added the dates...I was right...
Then pour your nuts and seeds and mix together...I don't have the "newest" food processor so I don't think the motor is that strong.  I had to end up using my own muscle and continue to mix in the nuts further... 
Now were almost done.  As you can see I have set up an assembly line...energy ball mixture, sesame bath, and lined tray.  Scoop out your desired size of ball, roll in hand and then place the balls in sesame bath.  Roll several balls at once.  The reason for the sesame seeds, is so that the balls don't stick together and so they don't sick to your hands when you pick them up.  Place on them on a wax paper sheet.  If you plan on freezing them, layer the balls with a sheet of wax paper between them.  Place in fridge til they harden, then place in an air tight container or baggie and into the freezer they go!
I have to say, this is the first time I pre-soaked the dates and WHAT A DIFFERENCE in taste.  The balls have sooo much more flavor, that little bit of moisture, unleashed the sweetness big time.  I found them so sweet that I made the balls just into bite size pieces.  I ended up with 70 balls in total.  So get creative and see what tasty flavors you can come up with, enjoy!  

INGREDIENTS:
  • 1 1/2 cups dates, soaked and pitted
  • 1 cup dried apple rings
  • 1/2 cup raw almonds
  • 1/2 cup raw hazel nuts
  • 1/2 cup raw sunflower seeds
  • 1/2 cup raw pumpkin seed
  • 1 tbsp ground flax seeds
  • 1 1/2 tsp cinnamon
  • 1/2 cup of sesame seeds to roll the balls in.

Thursday, May 23, 2013

May 23rd...Sulphites in my Coconut milk?

I was shopping the other day for some Coconut milk and couldn't find my regular brand.  Instead, on the shelf were three different brands/types, so I flipped over the can to read the ingredients and was surprised to see that there were sulphites listed.  I just assumed in Coconut milk there would only be Coconut milk and water.  As you can see in the pictures above there are a lot more ingredients than that listed on this can... 
Sulphites are useful as food additives because they slow down bacterial growth on foods; improve the quality and texture of bread dough; prevent oxidation, or browning, of sliced raw vegetables and fruit; and reduce the chance of black spots developing on shrimp and lobster.  Sulphites also occur naturally in some foods, such as beer, wine, fruit and vegetable juices...
Sulphites aren't a problem for most people. However, the United States Food and Drug Administration estimates about one percent of the American population are sensitive to sulphites. The FDA also estimates five percent of people who have asthma are allergic to sulphites. Sulphite sensitivities may start at any time in a person's life and reactions can be mild, such as a rash or hives, or severe enough to trigger an asthma attack... 
I found this can with only 2 ingredients!  The information listed above is from the FDA, that being said I still try to choose foods with the least amount of additives or preservatives.  I don't want to put "added chemicals" into my body even if the FDA says it's OK!  So remember to flip that can, box or package and read your labels.  If you don't know what the ingredient is or you can't pronounce it, do you think it's good for you?

Monday, May 20, 2013

May 7th...Dream big, maybe not so big...

I once had a dream!...my husband would say "ya you and Dr.King"...he is full of sarcasm tonight because I'm calling him a "Dream Killer" or as he puts it, he's saving our neighborhood from me and my Boot Camp shenanigans.  OK here's the deal, we need a wall to do our Wall Balls on.  Every time the ball hits the house, pieces of gip-rock fall into our eyes, plus this can't be good for the side of the house.  So I thought, hey why not put up a cool board, save the side of the house and our eye balls.  Warren, my trusting husband said " sure" and off to work he went on it...
 Got his new saw out, the tool box and then started to brain storm with me on how to put it up...not a good idea, I think we speak 2 different languages.

 Ahhh...if he only new what idea I had in my head, I'm pretty sure we wouldn't have even gotten this far!

 So I started my end of the work, got the board painted, then put a "cool" saying on it, and I was ready to put it up! (notice how the word cool is in quotations, my husband says my idea of cool and the normal idea of cool are worlds apart!)

 Oh how I love my husband...he went and hung it up, trying to be supportive of my idea.  But as soon as he got down from the ladder, that was it!  There was no freak'n way he was going to have this hanging from the side of our house.  He said it's one thing having 3 tires sitting in our driveway painted like donuts, its another, hanging a sign off our freak'n garage so that the whole world can drive by and see it!  He thinks we should compromise...so now it will go on the back side of the house, where the deer and birds can stair at it and wonder who is the crazy lady that moved in here!

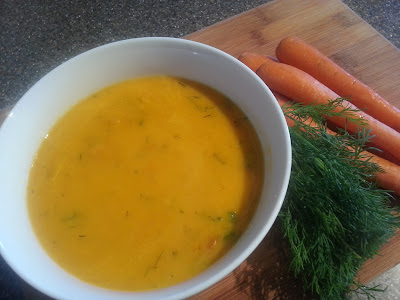
May 20th...Discovering "Carrot & Dill" soup while preparing for MOMAR!


My partner in crime, Alison and I, had the perfect day on Friday for starting our MOMAR(Mind over Mountain Adventure Race)training.  We hopped on our mountain bikes and headed towards Sooke via the Goose trail.  I have to say, I was a weee bit hesitant about getting on a bike because it's been so long.  I reminded Alison of this as we road our bikes out of her yard and headed down a very steep dirt trail...did I mention I had only one brake and did I mention I hadn't been on a bike in YEARS!  I borrowed one of Alison's bikes and was totally unfamiliar with the gearing system, let's just say I walked the bike up all the hills and skidded down the steep hills...at one point I was so excited because I thought I had it in the right gear but as I turned the corner I suddenly realized I was going up a hill, not down.  So off I got, before I fell off and walked the bike up the hill...AGAIN!  We stopped by The Stickelback West Coast Eatery to replenish ourselves since we had been riding for at least 35 mins.! We had the most Delicious Carrot and dill soup and all I could think of is how could I make this Paleo friendly...so here it is...
Low-sodium chicken broth, low-fat coconut milk, one pound of carrots, green onions, garlic clove, one onion, and fresh dill...
 Peel and chop one pound of carrots, place into pot and boil until tender.  Saute one onion and 1 tsp crushed garlic in a bit of olive oil until onions are clear...
 Once carrots are tender, drain out water and add 3 1/2 cups of chicken broth. Add your onions, garlic and simmer on low with the lid on, for about 25 minutes...
Then, you can either puree the soup in a food processor or in the pot with hand mixer...
Add 3/4 cup of light-Coconut milk, 2 tbsp chives or green onions and 2 tbsp fresh chopped dill.  Mix in and simmer on low for about 5 minutes...
And here you have it, yum!  I really liked this soup even though it's not as rich and thick as the one at the restaurant.  I preferred my "lighter" version which I choose to substitute the cream with light Coconut milk.  What I love about my soup is that it's light on your waist-line and that the richness doesn't over power the fresh dill.
What a great way to kick off our training!

Wednesday, May 15, 2013

May 15th...Coconut creamer...the official taste test!

Everyday I start my Boot Camp class with the "circle of love" question of the day...today it was, "what do you put in your coffee?"  I'm proud to say I have weened myself off the "crack-like" International Delight 100% chemical creamer!  I moved onto a splash of half and half, because I can't do just black coffee and yes I have tried, Almond milk, Coconut milk out of the can, you name it, I've tried it!  
 Then one of my awesome clients told me that she found Coconut Milk "creamer" for your coffee at the Red Barn.  So I went and got me some!  This little carton costs $3...my half and half is about $2  and the chemical goodness called International Delight is about $5.  I did the official taste test and have to report that I didn't really notice a difference between the Coconut milk and the half and half.  I had thought the Coconut creamer might have been a little bit sweeter, but not so...
As you can see I posted the nutritional info and ingredients of each.  The Coconut milk and half and half have TWO ingredients...the Int.Del. creamer has 14 ingredients...hmmm tough call, NOT!  I think if your a hardcore Paleo fan then you might choose the Coconut milk, but for myself, I'll save some cash and go for the half and half.

Tuesday, May 14, 2013

May 14th...Paleo eggs stuffed with tuna salad!

The one thing I tend to do when I'm on an "eating clean" kick is, eat the same thing over, and over, AND OVER.  So I'm kicking chicken to the curb this week!  Bring on every other source of protein possible or what's ever in my cupboard or fridge!  So I'm starring at a can of tuna, some very ripe avocados and craving pickles...what to do?  I remembered back at Easter, one of my clients Kathleen, made these amazing stuffed guacamole eggs with a piece of bacon on top, they were sooo good.  So here's my version...
Here's what you'll need...2 eggs, 1 can tuna, 1 avocado  1/4 cup plain Greek yogurt, 1/2 tsp mustard, 1 pickle finely chopped and 1 green onion, just the green ends...
Get your eggs boiling, at least six minutes, put into cold water to chill and place in fridge...
Mix all ingredients into a bowl, go easy on the mustard as it can be over-powering...
My secret weapon...Epicures' Guacamole dip seasoning, 1 tbsp...my friend Fiona, says it's like "crack-dip" because it's so tasty and addicting...I have to agree!  If you like a more intense flavor, squeeze a little lime juice into the mix...
So instead of chips, I made red pepper boats.  You get the sweet from the pepper and the crunch, just like chips! 
This is a great post workout meal.  The tuna and egg whites are high in protein, which help to replenish your muscles.  The avocado is a healthy fat which make you feel full and the carbs from the peppers are a great source of fiber!  Use the avocado mixture as your base and fill it with whatever your craving!

Monday, May 13, 2013

May 13th...Paleo Pigs in a Blanket with a Mango twist, plus are your fitness goals realistic?

How realistic are your fitness goals?  
I know I often say, "go big, or go home" and I'm not trying to be a "dream killer" here.  I just think that each of us needs to really take a moment, and calculate exactly what it is you want and how you're going to get there.  I like to encourage my clients to think outside the box and believe in themselves, that anything IS POSSIBLE...but you have to be willing to work for it.  I totally believe in "baby-steps"...a friend once told me, the shortest route is ALWAYS, the longest way...By setting smaller goals, your setting yourself up for success.  How?  By building confidence both mentally and physically and not running into burnout or injury.  If you have no plan, even with the best intentions, your willpower will run out and you'll be more likely to fail.  So do your research, talk to people who have achieved a similar goal, pick their brain and ask for their advise.  Plan it out on paper, write the details down, post your goal somewhere you can see it daily, so you can track your success.  The exact amount of effort you put into achieving your goal, is a direct result of the final out come.  
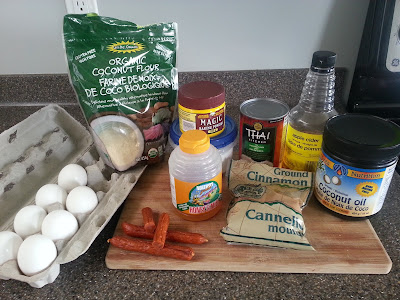
OK so this pile of ingredients might look familiar, as it's from last weeks recipe for Paleo Coconut flour Blue Berry muffins...notice I have some pepperoni sticks in there.  Well I decided that I could use the Coconut flour recipe as my base and treat it like a bread substitute...the possibilites are endless for what you could create and stay with thin the Paleo guidelines...so I was craving me a little "pigs in the blanket", that's where the pepperoni comes in...

Then I spotted my Mango sitting on the counter and thought of a sweet and savory mixture...
I thought this sounded sooo good, but just to cover my butt, I decided to split the mixture three ways...4 muffins have just pepperoni, 4 have have just Mango slices and 4 have pepperoni AND mango mixed together!
OMG the sweetness of the mango and the savory from the pepperoni, heaven in every bite!  I'll list the recipe below, for the "how to", go back a couple of posts to May 2nd and the complete recipe is there...I'm so excited to start my next batch hmmm what am I craving now?  Send me your ideas!

-4 ½ tablespoons of Coconut Oil
-6 Eggs
-4 tablespoons of milk (coconut milk, etc. or if can have dairy) or water
-1/2 teaspoon Apple Cider Vinegar
-1/2 teaspoon Baking Soda
-1/4 teaspoon Baking Powder
-1 teaspoon Cinnamon
-1/4 teaspoon sea salt
-1 tablespoons Honey or Stevia (optional)
-1/2 cup of mango, finely chopped
-2 small pepperoni sticks, finely chopped


Wednesday, May 8, 2013

May 8th..."wrap" up your lunch!

OK so I'm notorious for eating the same thing over and over.  I will discover a new recipe and eat it to death.  Right now I'm hooked on the Paleo friendly Bacon and Broccoli salad, yummERS!  I always try the original recipe, then by luck run out of ingredients, which forces me to get creative and use what I have in the fridge or cupboard...i.e. todays lunch!
 Below are tuna wraps.  I used Romaine "pre-packed" leafs, tomato and onion tuna out of a can, fresh avocado and mango...I love mango's and put them on everything!  TIP...mash up your avocado into the tuna to make it creamier and then there's no need for mayo and extra calories.  You could use any protein here, turkey slices, chicken and even tofu.  The Romaine leaves give it the crunch your looking for instead of bread...
 The broccoli salad has the sweet from the fruit and savory from the bacon.  The dressing is 1/4 cup plain Greek yogurt and 1 tbsp light mayo (optional...I did not make the homemade Paleo mayo...scooped mine out of the jar!) 1 tbsp lemon juice...you might want to add more or less lemon juice depending on how "tart" you like it.  And a dash of salt and pepper.  I used about 3 heads of broccoli, the size of my palm.  1/2 cup chopped celery, 1/4 cup dried cranberries, 2 tbsp sun flower seeds or sliced almonds, 5 pieces of chopped BACON!  You can use either 1/2 cup chopped red grapes, apples or mango...whatever you have lying around...go easy on the nuts, seeds and dried fruits as they can pack a lot of calories...use them just to give a little extra crunch or to just make it look pretty!

Tuesday, May 7, 2013

May 7th...Summer Salads, Zucchini time!

Well I think summer is officially here, I actually have a tan on my arms and Monday morning's Boot Camp class, the ladies were all over-heating!  Not that were complaining but it was pretty freak'n hot.  Since the warm weather has arrived it's time for summer salads.  I prefer homemade salad dressings, little bit of your favorite oil, mine right now is a Avocado oil and a Pistachio oil, mixed with any kind of citrus juice and some fresh herbs and spices.  You can pretty much put in on anything for a burst of flavor.  I have my fancy new wide peeler, sooo many cool things you can do with this...I know many of you have already discovered this tool...OK so I'm a late bloomer, anyhow I've seen zucchini salad recipes on so many magazine covers, that I thought I better try this.  So here we go...   
 In a bowl mix 1 tbsp of your favorite Oil, 1 tbsp Lemon juice, 1 tsp Parsley flakes, 2 tbsp finely chopped Red onion ( I forgot to put it in the picture), 1 tbsp chopped Sun-dried tomatoes(packed in oil), 2 tbsp chopped Black olives and a dash of salt and pepper.  Whisk together... 
 I decided to cut my Zucchini in half, then peel it...trying to figure out how to eat this salad somewhat gracefully...
Pour your dressing over the zucchini, toss together and leave in the fridge to chill for about 30 mins...

And here you have it!  This salad was so tasty, the longer it sits, the better.  I could have eaten the whole bowl because it's so refreshing and so light.  This recipe is based on a serving for 2 people...if you have to share it.  Be sure to measure out the oil.  Many recipes just say to just drizzle it over your salad but that can be dangerous cause your more likely to over do it and have extra unwanted calories.  You could add almost anything to the salad, peppers, sliced almonds right before you serve it for added protein and crunch, and water chestnuts for added crunch as well.  Think of this as your base to start with and let me know what you come up with!