Follow the Leeder in Personal Training and Boot Camp!

Follow the Leeder in Personal Training and Boot Camp!

Saturday, October 5, 2013

October 5th...Paleo friendly breakfast bars!

 Well lately I have been in the bad habit of eating the same foods over and over, I won't list all my excuses why, but I really need to change things up a bit.  Especially when it comes to breakfast, I just want to grab and go.  The reality is, mornings are busy around here, I need something I can eat while multitasking!  So that usually comes in the form of a bar or a ball of some kind.  I came across this recipe and "Mel-er-ized it" by subbing out regular flour with Almond flour and vegetable oil with Coconut oil, plus I added some other healthy stuff as well.  Let's get started!
In a food processor combine Almond flour and salt, pulse once or twice to mix. In a separate bowl, combine Coconut oil, honey, vanilla and water.  While pulsing add your liquids.  Then combine cranberries, shredded coconut, nuts and seeds into a bowl and add while pulsing.
 Line an 8x8 baking dish with parchment paper and spread dough out evenly.
Bake at 350 degrees for 20mins.
I managed to get 16 bars out of this recipe but it's highly likely that I would eat 2 pieces as they were so good!  In the second batch I made, I added extras like Chia seeds, whole ground Flaxseed Meal and Wheat Germ.  They tasted great but I should have added more liquid as the bars held together...but I waited too long to cut them and many of the bars became too flaky and fell apart.  Of course all those yummy bits and pieces, I saved and added to my yogurt, enjoy!

INGREDIENTS:
1 cup almond flour 
  • ¼ teaspoon sea salt  
  • ¼ cup coconut oil
  • 2 tablespoons honey
  • 1 tablespoon water
  • 1 teaspoon vanilla 
  • ½ cup unsweetened shredded coconut
  • ½ cup pumpkin seeds 
  • ½ cup sunflower seeds 
  • ¼ cup slivered almonds
  • ¼ cup unsweetened cranberries

Wednesday, October 2, 2013

October 2nd...no bake Gluten Free cookies!

 I love this recipe because it's a "no-bake" recipe, which means I can't burn anything!  You may have most of these ingredients kicking around in your cupboards already.  No worries if you don't have the exact ingredients, such as Almond butter, maple syrup, almonds, dried fruit...you could use natural peanut butter, honey, hazel nuts or cashews and any dried fruit or mini dark chocolate chips, possibilities are endless!
 Load up the first 5 ingredients on the list in your food processor...
Make sure to scrape the container to get all the ingredients stuck at the bottom mixed in.  Then add the oats and just a pinch of salt, mix one more time... 
Line baking sheet with Parchment paper.  Scoop the dough out with a spoon and roll into small balls.  place on cookie sheet and press down...I made mine about the size of a Toonie.  Place in fridge for about an hour or so.
This recipe yields about 14 cookies...they may be small but they're big on taste and enough to keep your sweet tooth at bay!  
INGREDIENTS:
1/2 cup dried cranberries
1/2 cup dried apricots
1/2 cup Almonds
2 tbsp Almond butter
1 tbsp Vanilla
then add...
1/4 GLUTEN FREE oats
pinch of salt

You might need to add 1-2 tbsp of water after the dry ingredients, just to loosen things up.

Nutritional info per cookie : calories 59, fiber 1g, protein 1.5g, fat 2.3g and sugar 4.5g if you use "sweeten" dried cranberries, so spend a little more to get the unsweetened cranberries and you'll cut the sugar by half!

Monday, September 30, 2013

September 30th...Think big, Dream BIGGER!

Well after a summer off and a "little" time for me, I'm ready to get blogging again.  Don't get me wrong, I love doing my blog but something had to give.  At the beginning of summer I really wanted to do something to get myself more involved in the community and get the community more aware of their own health.  So I took my no excuse attitude and decided to offer a free boot camp class EVERY Saturday for the summer...all participants had to do was bring their "can-do" attitudes and a healthy can of food for the Westshore food bank.  Now that I can look back, I had no idea how time consuming taking this on would be.  I put a lot of work into each class because I wanted the experience for each boot camper to be better than any class they had ever done.  As the Saturdays went on, I tried making each class better than the last and the exercises more creative.  I would spend all week thinking up different ways to do an exercise.  My goal, was for the boot campers to have a new experience each class.  I'm pretty sure I reached this as I quickly had a following and the rest is history! 
 This past Friday I was nominated for two awards from the Westshore Community, Leadership in Healthy Communities and The New Business Excellence award.  I won the New Business Excellence Award, it was pretty awesome as you can see by the smile on my face! 
I think I went to bed with that grin on my face!
Friend and Boot Camper, Terra was my date for the night!  Two hot Momma's out on the town...see if we can stay awake past 9pm!
 
 Crystal, my hair dresser extraordinaire, was nominated for Employee of the Year at Cabello Salon! 
 And Kristy Martin and her father, Farley Martin Notaries Public, won the award for "going green"...Environmental Stewardship!
 And just hanging out with fellow Westshore Chamber member, Patrick from Remax Realty. 
 Our official group picture!
 So I had to get a picture of me in heels and a dress, just so people would believe I own such items!  Rock'n a pose with fellow boot campers / chamber members, Christina Scott from Black Press and Dale Collins with the other set of pipes of Prosperity Planning.
Here was the first of three loads of food that I dropped off at the Westshore food bank this summer...that was a pretty awesome day!  WHY...
Because it took a moment like that to realize what all my effort was for.  When I dropped off all the food, I saw families who had nothing, they were waiting their turn in line hoping to get enough food to last them the week.  We can sit here and get teary eyed and feel sad in our warm houses with cupboards full of food...or we can do something about it.  Take two minutes out of your day and see how you can contribute to your community.  Why not organize something at your work...take the month of October, ask customers to bring an item for your local food bank or ask them to clean out their bathroom cupboards and bring in all the "hotel" toiletries, food banks are need of personal care items big time.  Then offer your customers a small gift card, they will like the idea of winning something and they will feel good knowing they are helping contribute to their own community.  
Think big, Dream BIGGER! 

Tuesday, July 30, 2013

July 30th...Snacks: Healthy Banana chips!

So I'm looking in my fruit bowl at my over ripe collection of bananas and wondering what to do with them all?  Then I remembered that I ask the my clients in the gym to send me some of their favorite snack ideas.  Rebecca had brought in these homemade banana chips and they were sooo good!  So here's my first attempt at Banana chips!  But first I'm going to tell you HOW bananas chips CAN BE a healthy snack...bananas are a great source of potassium and fiber.  Why is this good for me?  Potassium, is a simple mineral with a crucial job: helping your heart beat.  A hundred thousand times a day, potassium helps trigger your heart to squeeze blood through your body.  Potassium is a critical electrolyte  which allows our muscles to move, our nerves to fire and our kidneys to filter blood.  Fiber, I could go on and on about how great fiber is for you, but all you have to know is that it keeps you having regular poops!  Good enough reason for me!  
  
 All you need is lemon juice and bananas!  Be careful, many store bought banana chips are deep fried and covered in sugar!  READ YOUR LABELS!
 Peel and dice bananas up into thin pieces, quickly toss them in lemon juice.  The picture shows 3 bananas but I ended up using 4...
Then place on a parchment paper lined cookie sheet.  Set oven to about 200-225 degrees  depending on your oven.  Bake for 1 hour and 45 mins.  I thought I'd be creative and sprinkle some of the banana chips with Cinnamon and Mango-Curry seasoning, just to mix things up a bit...
OK so here I am 2 hours and 10 mins. later. I turned up the oven to 225 degrees after 1 hour and 45 mins.  I've had some samples to test the crispiness of the chips and I have to say YUM...but this is crazy!  Good thing I have stuff to do around the house today, because these chips are taking way too long for my liking.  In the picture above I've decided to flip the chips over and put them on a new sheet of parchment paper.  In hindsight, maybe brushing on lemon juice lightly, would have been better than a quick toss in the juice...maybe I made them too wet that is why they're taking so long!
And here you go!  OK, OK they were worth the wait...just barely.  The mango-curry is pretty awesome tasting.  JUST REMEMBER to not eat the whole pan...about 20 chips is equal to one banana, 80 calories.  These would be great added to some Greek yogurt!

Thursday, July 18, 2013

July 18th...Burgers: Beef & Pork Apple Spice burgers!

Arrrrg!  The on-going saga of "whats for dinner?"  Were well into summer and I'm bored with hamburgers already...so I thought let's shake things up a bit.  I cruised through my cook books and the internet seeing what I made my taste buds water.  I came across a pork and stuffing style burger...I'm doing the Paleo diet so bread/stuffing is a no-no...here's what I made...
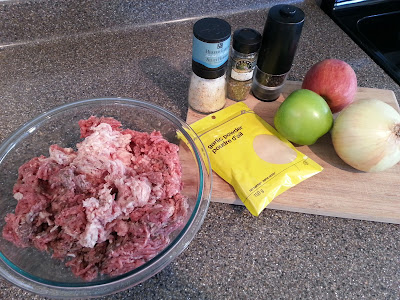
 I combined lean ground beef and pork.  Apparently the pork makes for a juicier burger.  I'm using Italian spice, garlic powder, Sea salt and pepper, 2 apples and an onion...
 Chop the apples and onions up into into little pieces and I say "little" because I did not do that.  It's not a huge deal, it's just that when I put the burgers on the bar-b-q, I ended up loosing some of the apples and onions off the edges because they were too big to be held in by the mixture...
 I used 2 packages of meat, one pork and one beef.  I can't stand recipes that serve 4pp...I have 3 boys and a husband, so I'm looking for realistic recipes that will leave me with left-overs for the next night or to freeze and save for later...come on people were hungry here...4pp serving WTF!  As you can see I have separated the mixture into 2 bowls.  Good thing I take pictures after the fact, because I tried to mix this all together in one bowl, what a mess all over the counter!
This recipe made me 14 burgers and one mini one.  As you can see the burgers are a good size and so are the pieces of apple lol!  Don't be afraid to make your burgers big as they will shrink up on the bar-b-que.  These were just a little bit bigger than the palm of my hand.  Cook burgers on medium on the bar-b-que for about 6-7 mins. per side.
OK these turned out really good!  Super moist and super tasty.  I served mine on a bed of coleslaw mixed with 2 tbsp of Guacamole.  The burger is about 240 calories for the size I made.  I was thinking a little dash of cinnamon would have been good as well, next time! 

Friday, July 5, 2013

July 5th...I Mel-er-ized a Dark chocolate, Almond-butter frozen Banana sandwich!

Alright, I will not take credit for this SUPER...YUMMINESS of a party in your mouth!  I saw these posted on Face Book and as awesome as they looked, I knew they would not be bikini body friendly!  So I decided I would Mel-er-ize them into something healthy.  All you need are 3 simple ingredients... 
So the original recipe uses bananas, peanut butter and milk chocolate...I'm using Almond Butter because it's healthier than peanut butter...just read the labels.  Almond butter has 1 ingredient and peanut butter has at least 10 and 8 of which, I cannot pronounce.  Banana is a Banana.  And Dark chocolate, has less sugar and fat and, a higher Cocoa bean count.  This makes it higher in nutrients.  One of those nutrients are flavonoids, a special class of antioxidants which help prevent cell damage in your body...
First you want to get the chocolate melting, above I'm using a double boiler.  Start this process out on low-med. heat, it will take you a few minutes to get everything else going and you don't want to burn the chocolate...
Secondly, you need to slice up your bananas HINT...leave your bananas in the fridge to get hard so that when you slice them into bite size pieces, they don't get all mushy and slimy...
Next, I use just a dab of Almond butter, just enough to hold the bananas together.  Don't go crazy and load them up as if it were a "Smores"...remember 1 Tbsp = 100 calories!
Once your mini "banana-butter" sandwiches are built, your ready for the chocolate!
Now that the dark chocolate has melted, place Parchment paper on a cookie sheet and begin to dab a little on the top of each...
Once you have finished, place them in the freezer for at least an hour.  I know that's a long time to wait, but it will be worth it!  You have to think in terms of "less is more" here, because the ingredients are richer in flavor, therefore you can use less, and EAT MORE!
I used 3 bananas, 6 squares of chocolate and about 1 Tbsp of Almond butter, which made me 25 pieces.  Each mouthful is about or less than 25 calories, so take a bite, let it melt in your mouth and enjoy!


Thursday, July 4, 2013

July 4th...don't waste it, save it and freeze it!

 OK I know you are looking at this picture and wondering, what is she up too...well I was making my homemade Quinoa Granola yesterday and the recipe called for 1/4 cup of canned pumpkin.  I opened the monster can of pumpkin and scooped out the 1/4 cup. This hardly made a dent in the can and now, what to do with the rest?
Every once in while, if I have enough coffee my brain can be pretty clever!  I knew I needed to freeze the pumpkin and that it had to be in little batches as that is what most my recipes require hmmm?  I took out the empty ice cube tray in the freezer and I say empty because no one ever refills it! 
Then I scooped out 1/4 cup pre-portions of the pumpkin and put it in the trays...keep your edges clean so that you can slide it out easy with a spoon.
Some how I had these giant freezer bags in my cupboard, I think I got them from the dollar store, anyhow I wrapped the tray with Clip Wrap first so the pumpkin wouldn't make a mess all over the bag, then I can reuse the bag again.
Once frozen, you can pop each one out and store in a smaller freezer bag for when you need it...remember to label the bag, because when it gets lost at the back of the freezer, you will know what it is!

Saturday, June 29, 2013

June 28th...Granola bars...adventures in baking!

OK I'm updating one of my favorite recipes and "go-to" snacks for the kids.  I decided to create this bar because the store bought bars, as convenient as they are, and yes sometimes I buy them too...are full sugar and 42 other ingredients that I can't pronounce.  
My granola bars have 8 ingredients...just say'n!
It seems each time I make these I change things up a bit...sometimes it's good and sometimes not so good.  Honestly I was feeling a bit lazy on Wednesday when I made this batch and thought I could speed things up by using my food processor...well my mini processor pureed the bananas just fine but was not powerful enough for the dates...let's just say my dishwasher was filling up fast!
So I pulled out the beast and went to town on chopping up the dates...quick hint from one of my Boot Camper's Janine, soak your dates in warm water for a few minutes while your getting things organised.  This will make them chop up easier and not burn out the motor in your food processor!
If it's for the kids and it's healthy, I like to add dark chocolate chips so they think it's a treat.  If you put your dark chocolate chips in a baggie and pound them out, you can use less as they spread through-out the mixture.  This means less sugar and less calories added to the recipe.
As my adventures went along, I mixed all wet ingredients then slowly added the dry.  I thought if I added the oats last, they wouldn't get pulverized in the  food processor cause I was just "pulsing it" slowly...I was sooo wrong!
In the end, they turned out soft and chewy and tasted great.

Below, is the original recipe that I didn't mess with!  Notice how the oats are whole and not all minced up!
Above, is a picture of the batch I made today, AND mixed all the ingredients in by hand, except for the dates, which I used the food processor.  These are more like bars and easier for the kids to eat.
On a side note, today was not my day for baking...I started out with a batch of bars in the oven, shortly after I could smell smoke and wondered if something was on fire in the oven...nope, just the wax paper!  ARRGGG!  Why  can't Wax paper and Parchment paper be two different colors...just say'n.  My next mess...if you look close at the picture, you will notice that I'm holding the blades to my mini food processor and in the processor are dates.  I'm trying to chop the dates up and in between, I keep taking the lid off and on.  I can't figure out why the're not getting smaller...after a few minutes of this, I look down at the counter as I'm pulsing the dates and see the blade sitting there. Good thing I can laugh at myself!  You can get really creative with these bars and add all kinds of healthy stuff such as nuts...almonds & cashews, seeds...flax or chia, dried fruits like apricots, coconut or berries.  JUST BE CAUTIOUS...the more you add, the more you increase the calories! I used a cookie sheet, and got about 15 bars out of this recipe.  I cut the bars a little bigger than what you'd get from a store bought bar and it works out to about 105 calories a bar!

INGREDIENTS:
-1/2 cup unsweetened apple sauce
-2 mashed bananas
-1/4 cup Sunflower oil
-1 cup chopped dates (pre-soak dates in warm water for 5 mins.)
-1/4 cup unsweetened cranberries
-1/2 cup Coconut flour
-1 1/2 cups large flake oats
Mix wet and dry ingredients separate, then combine together in a bowl.  Line a cookie sheet with Parchment paper for thinner bars or use a 9x9 glass dish for thicker bars.
Bake at 350 degrees for 30 mins...ovens vary so poke bars with a toothpick and if it comes out clean your done!